Skip to content
If you’ve ever spent a summer road trip in Florida with a failing RV air conditioner, you know just how essential that cool, steady airflow is. Your RV’s air conditioning isn’t just a comfort feature—it’s a lifeline on sweltering days. Yet, many RV owners find themselves unsure of what to do when that cold air suddenly stops flowing.
At My RV Shield, our technicians have repaired, maintained, and replaced hundreds of RV air conditioning units across Florida. Drawing from that experience, this RV AC repair guide walks you through how to identify, troubleshoot, and fix the most common issues. Whether you’re a DIY enthusiast or prefer to rely on RV AC repair services in Sarasota, FL, understanding how your system works can save you time, money, and stress.
Understanding How Your RV Air Conditioner Works
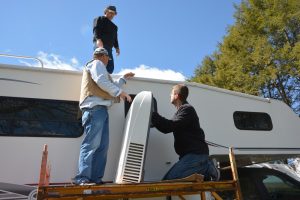
Before diving into repairs, it helps to understand what’s happening above your RV roof. Most RVs use a roof-mounted AC unit powered by electricity—either shore power, generator, or an inverter. The system draws warm air from inside, cools it through a refrigerant cycle, and then circulates that cooled air back inside.
There are two main parts to focus on:
- Compressor and condenser coils (outside unit): Handle the cooling process.
- Evaporator coils and blower (inside): Push the cooled air through your RV’s ducts.
When one component malfunctions—like a dirty coil or weak capacitor—it can cause the entire system to underperform or shut down.
Step 1: Diagnosing the Problem
Most RV AC repair situations start with a simple symptom: your air conditioner won’t turn on, isn’t cooling enough, or makes strange noises. Here’s how to start diagnosing:
- Check the power source: Ensure your RV is plugged into a reliable power supply. A tripped breaker or faulty extension cord can mimic AC failure.
- Inspect the thermostat: Sometimes, the issue is as simple as a dead thermostat battery or loose wiring.
- Listen for compressor sounds: If you hear the fan but not the compressor, that’s often a sign of a capacitor or refrigerant issue.
- Examine the air filters: Dirty filters restrict airflow and can cause icing or overheating.
These simple checks can often resolve small problems before they become costly breakdowns.
Step 2: Cleaning and Maintenance
One of the easiest and most effective RV air conditioner repairs is routine cleaning. Dust, debris, and even insects can find their way into the unit, clogging coils and fans.
Start by turning off power to the AC, then carefully remove the shroud (the plastic cover). Clean the condenser and evaporator coils using a soft brush or compressed air. Avoid using water directly unless you’re sure your model is sealed for it. Next, replace or clean the air filters inside your RV.
Technicians at My RV Shield often find that half of the “AC not cooling” complaints in the Sarasota area are caused by poor airflow due to clogged filters or coils. Regular cleaning every few months—especially during Florida’s humid summers—keeps your system efficient and prevents overheating.
Step 3: Electrical and Component Inspection
If cleaning doesn’t fix the issue, it’s time to inspect key electrical components. Capacitors, relays, and thermostats are the most common culprits behind sudden AC failure.
- Capacitor failure: When the compressor won’t start, but the fan runs, it’s often a faulty capacitor. Replacing it is a relatively quick job for a trained technician.
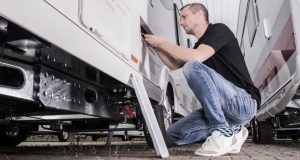
- Wiring issues: Vibrations from travel can loosen wires or connections. Always inspect for burnt or frayed wires before running the unit again.
- Thermostat calibration: If your thermostat doesn’t match actual temperatures, recalibration or replacement may be necessary.
If you’re not comfortable handling electrical components, this is where professional help makes a difference. Certified RV AC repair services in Sarasota, FL can safely handle electrical testing and part replacement while ensuring the system meets manufacturer specifications.
Step 4: Checking the Refrigerant System
Unlike residential systems, RV AC units are typically sealed. That means if refrigerant is low, there’s likely a leak—and it should only be handled by an EPA-certified technician. Signs of refrigerant problems include:
- Weak airflow despite the fan running
- Ice buildup on coils
- Hissing sounds from the unit
At My RV Shield, we use leak detection tools and pressure gauges to confirm refrigerant levels and locate the source of the issue. A technician can recharge the system, replace damaged coils, or seal leaks, restoring full cooling capacity without risking system contamination.
Step 5: Preventative Maintenance for Long-Term Cooling
Regular maintenance is key to avoiding costly RV AC repair in the future. Here’s what our technicians recommend:
- Inspect and clean your unit every 3–6 months.
- Check seals and insulation around the unit to prevent leaks of cooled air.
- Lubricate the fan motor if it’s not sealed.
- Use a surge protector to guard against electrical damage when plugging into new campgrounds.
- Store your RV properly when not in use—covering the unit helps protect it from UV and debris damage.
Preventative maintenance can extend the lifespan of your air conditioner by years, saving you from inconvenient breakdowns during road trips.
When to Call a Professional
Some repairs are perfect for DIY owners, but others require certified expertise. If you notice burning smells, frequent tripping breakers, or your AC shuts off randomly, it’s time to call in a technician.
In the Sarasota area, My RV Shield’s RV AC repair services provide fast, on-site diagnostics and repair. Our team carries OEM parts for major RV AC brands and ensures every repair meets factory performance standards. Professional service not only restores cooling faster but also helps maintain your manufacturer warranty.
Common Mistakes to Avoid
Even seasoned RV owners can make small mistakes that lead to bigger problems. Avoid these pitfalls:
- Running your AC with clogged filters: This strains the compressor and increases energy use.
- Ignoring unusual noises: A buzzing or clicking sound can mean loose components or failing electrical parts.
- DIY refrigerant refills: Without the right tools, overcharging or contaminating the system can cause irreversible damage.
Catching issues early and scheduling regular maintenance is always cheaper—and safer—than a full system replacement.
FAQs
1. How often should I service my RV air conditioner?
You should inspect and clean your RV AC every 3 to 6 months, especially before summer or long trips. If you travel often in humid areas like Sarasota, more frequent cleaning is ideal.
2. Why is my RV AC blowing warm air?
Warm air usually points to dirty filters, low refrigerant, or a failing compressor. Start with basic cleaning and power checks—if that doesn’t help, contact a professional for a refrigerant or electrical inspection.
3. Can I run my RV AC on battery power?
Most RV AC units require more power than standard batteries can provide. You’ll typically need shore power, a generator, or a large inverter system designed for your AC’s wattage.
4. Is replacing my RV AC better than repairing it?
If your unit is over 10 years old, or if repairs cost more than half the price of a new system, replacement is often the smarter investment.
5. How much does RV AC repair cost in Sarasota, FL?
Costs vary based on the issue—simple capacitor or thermostat replacements can be under $200, while major compressor repairs can run $500 or more. My RV Shield offers transparent, upfront pricing and free estimates for all repairs.
Final Thoughts
Your RV’s air conditioner is vital for comfort and safety during your travels. Whether you’re troubleshooting a noisy compressor or planning regular maintenance, understanding the basics of RV AC repair helps you stay cool and confident on the road. At My RV Shield, we pride ourselves on helping RV owners enjoy reliable cooling wherever the road takes them. If you’re experiencing issues or just want to schedule a maintenance check,